
Resident Evil 4: Chapter 9: Walkthrough
- Last updated on
This article provides Chapter 9: Walkthrough Chart in RE4 Remake including strategies for defeating bosses and obtaining items.

| Chapter8 | Chapter10 |
Walkthrough Chart for Courtyard
| Walkthrough Steps for Courtyard | |
|---|---|
| 1 | Lower the three levers in the Courtyard |
| 2 | The first lever is located in the center of the map |
| 3 | The second lever is in the Southwest of the map, instruct Ashley to pull it |
| 4 | The third lever is located by going East from the North |
| 5 | Proceed forward and go to the location of the Merchant |
Lower the Three Levers in the Courtyard

Once Chapter 9 begins, you need to go to Courtyard and lower the three levers. Lowering the three levers will open the gate, so make your way to each tower in the respective positions.
① Climb the Central Tower

The first lever is located in the Courtyard, where you climb the central tower. It is recommended to lower the lever first as it is easily found.
② Give Instructions to Ashley with the Lever at the Back

The second lever is located in a passable area while Ashley is lowering the device in the Southwest of the map. Give instructions to Ashley near the device and control Leon to climb the tower. When Leon lowers the lever, Armadura will attack Ashley, so it is essential to hurry and help her.
③ Going around from North to East to Reach the Lever

The third lever can be reached by going around the outer perimeter of the Courtyard. It is easy to get lost in the maze, so proceed while checking the position on the map.
Proceed forward and go to the Merchant's location

After lowering the three levers and opening the door, proceed forward and go to the Merchant's location. It is recommended to modify and purchase items at the Merchant to prepare for future battles.
There is a tram that can take you back to the Shooting Range and the entrance to the old castle
Near the Merchant, you can take the elevator to the Shooting Range or ride the tram to return to the entrance of the old castle. If you have any detours or unfinished elements, it's worth stopping by.
| Merchant Guide |
| Tips for achieving S rank in the Shooting Range and getting high scores |
Walkthrough Chart for Obtaining the Three Heads
| Steps to Obtain the Three Heads | |
|---|---|
| 1 | Collect the three heads and insert them into the statue |
| 2 | In the Dining Hall, have Ashley sit at the second table on the right facing the painting, and Leon sit at the back left table and ring the bell |
| 3 | Pull the lever in the location with in between the paintings |
| 4 | Defeat all the Armadura and have Ashley pull the lever |
Collect the Three Heads and Insert Them into the Statue
| 1st Floor Map | 2nd Floor Map |
|---|---|

|

|
Once you arrive at the Grand Hall, you need to collect the three heads and insert them into the statue. Visit the locations where each head is located and solve puzzles or engage in battles to obtain them.
①Ring the Bell at the Table after matching the Painting

In the Dining Hall located Northeast of the map, sit on the chairs at the table with dishes and food to match the painting and ring the bell. The answer is to have Ashley sit on the right side facing the painting, and Leon sit left side at the back.
| List of Puzzle Solutions |
②Pull the Lever in the Location with the Armadura

In the location where the Painting is found which is located Southeast of the map, pull the lever. This is the place where the Armadura can be found. To reach the location with Armadura, defeat the surrounding enemies and climb the ladder when you find an opportunity.
Defeat the Armadura and Pull the Lever with Ashley
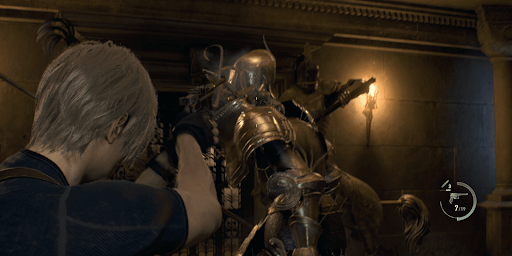
In the room with the Armadura located on the North side of the map, first eliminate all the enemies. Shoot the weak point of the Armadura which is the neck. When you perform melee attacks, the helmet will come off. This makes it easier to aim for the entire head. Once you have defeated all the enemies, work together with Ashley to pull the lever.
Walkthrough Chart to Rescue Leon
| Steps to Rescue Leon | |
|---|---|
| 1 | Proceed to the Library with the blue lantern |
| 2 | Place the lantern on the stand at the back of the Library |
| 3 | Obtain a key bundle on the 2nd floor after opening the stairs |
| 4 | Use the second key from the right in the elevator |
| 5 | Set the clock to 11:04 according to the memo on the desk |
| 6 | Proceed while stopping the Armadura with the lantern |
| 7 | Set the clock at the midpoint of the map to 11:04 |
| 8 | Pull the four ropes at underground Mausoleum |
| 9 | Arrange the lantern to match the light and patterns |
| 10 | After obtaining the emblem shield, dash back |
| 11 | Clear Chapter 9 after setting the emblem shield |
Proceed to the Library with the Blue Lantern

After watching the movie and it's Ashley's turn to be controlled, proceed to the Library with the lantern that emits a blue light. The blue lantern has the effect of stunning and stopping the Armadura that appears later when you shine it on them.
Placing the Lantern on the Stand in the Library

Once you arrive at the library, place the lantern on the stand in the back. Placing the lantern will cause the bookshelf to move, revealing a device that leads to the location where the staircase is.
Obtaining the Bunch of Keys on the 2nd Floor after revealing the staircase

After activating the device and revealing the staircase, try to obtain the key bundle on the 2nd floor. The Bunch of Keys can also be used on nearby treasure chests and mechanisms. Use a key that matches the nearby mechanism and pattern to unlock it.
Using the 2nd Key from the Right in the Elevator
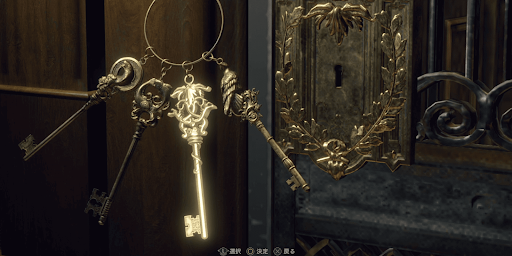
After obtaining the Bunch of Keys, rush to the elevator to block the path of the Armadura. The elevator is locked, so select the 2nd key from the right to unlock it.
Setting the Clock to 11:04 as indicated in the Memo on the Desk

After getting on the elevator and watching the cutscene, pick up the memo on the desk. The memo states "11:04." Adjust the nearby Grandfather clock to match the time and open the hidden path.
If playing on Hardcore or higher, set the clock to 7:00
On Hardcore difficulty or higher, the answer on the clock mechanism changes to 7:00. If you already know the answer, there is no need to check the memo, allowing you to save time.
Progressing while stopping the Armadura with the Lantern

In the area beyond the door opened by the Grandfather clock, the Armadura will attack. Use the lantern to illuminate and stop its movements while progressing forward. Once you have stopped the enemy's movements, turn the handle to proceed safely.
Set the clock at the midpoint of the map to 11:04

After passing through the Library and reaching the midpoint of the map, there is a Grandfather clock. Align the clock hands to 11:04. The door behind the clock leads to the underground Mausoleum.
Pull the four ropes in the underground Mausoleum

Once you reach the underground Mausoleum, pull the four ropes with patterns on the door. Each time you pull a rope, the Armadura will start moving, so it is recommended to move quickly. After pulling all four ropes, proceed forward and go to the position with the blue flames. These flames immobilize Armadura.
Arrange the lanterns to match the pattern

Once you reach the deepest part of the Mausoleum, arrange the lanterns to match the pattern. You can place lanterns in three different locations, so it is recommended to solve the puzzle by swapping them with the ones Ashley is holding.
Dash back after obtaining the emblem shield

After solving the lamp pattern puzzle and obtaining the emblem shield, dash back to the location where Leon is and talk to him. Run back to the library and go up the stairs.
Clear Chapter 9 by setting the emblem shield

Return to the location where Leon is and set the emblem shield to clear Chapter 9. In the next Chapter 10, control of the character will switch from Ashley to Leon.
Chapter 9 Requests List
Blue Medallion Destruction 4

| Objective | Destroy all Blue Medallions |
| Location | Grand Hall |
| Reward | Spinel ×5 |
| No | Surroundings |
|---|---|
| 1 |

|
| 2 |

|
| 3 |

|
| 4 |

|
| 5 |

|
| 6 |

|
The medallion locations are displayed on the map
You can check all the locations of the Blue Medallions by opening the map, just like with other medallions. Destroy all five Blue Medallions while referring to the map as needed.
| List of Blue Medallion Locations |
Extermination of Vermin Once Again

| Objective | Exterminate all Mice |
| Location | Grand Hall 〜 Library |
| Reward | Spinel ×3 |
| No | Surroundings |
|---|---|
| 1 |

|
| 2 |

|
| 3 |

|
If you want to save Ammo, use the Knife to defeat them
Mice can also be defeated with Knife attacks, so if you want to save Ammo, it is recommended to defeat them with the Knife. However, the mice will run away when you get close, so if you want to easily defeat them, it is better to use Ammo from a distance.
| Pest Control Request: Locations of Pests (Rats) |
Location of Clockwork Castellan in Chapter 9
Northwest Edge of the Courtyard
| Map | Detailed Location |
|---|---|

|

|
The Clockwork Castellan in Chapter 9 is located in the northwest corner of the Courtyard. A large number of dogs will appear. It is recommended to change your position to the left side facing the wood and destroy it while hiding behind the abandoned materials.
| Chapter 8 | Chapter 10 |
| Village | |
|---|---|
 Chapter 1 Chapter 1 |
 Chapter 2 Chapter 2 |
 Chapter 3 Chapter 3 |
 Chapter 4 Chapter 4 |
 Chapter 5 Chapter 5 |
 Chapter 6 Chapter 6 |
| Castle | |
|---|---|
 Chapter 7 Chapter 7 |
 Chapter 8 Chapter 8 |
 Chapter 9 Chapter 9 |
 Chapter 10 Chapter 10 |
 Chapter 11 Chapter 11 |
 Chapter 12 Chapter 12 |
| Island | |
|---|---|
 Chapter 13 Chapter 13 |
 Chapter 14 Chapter 14 |
 Chapter 15 Chapter 15 |
 Chapter 16 Chapter 16 |
| Post Game | |
|---|---|
 Resident Evil 4 Remake Game Length Resident Evil 4 Remake Game Length |
 Clear Rewards and Replay Value Clear Rewards and Replay Value |
 Replayable Features After Clearing Replayable Features After Clearing |
|
| Difficulty Level | |
|---|---|
 Tips and Conditions for Achieving an S+ Rank Tips and Conditions for Achieving an S+ Rank |
 How to Get S+ Rank: Condition and Strategy How to Get S+ Rank: Condition and Strategy |
